E15 | Ridgewood Colonial Revival | Sugar Maple Revival
Season 46 Episode 15 | 23m 42sVideo has Closed Captions
With the build coming to an end the whole gang comes down to help Zack and the homeowners.
Jenn Nawada meets tree care expert Matt Chase, who points out issues harming the Sugar Maple. In the basement, Richard Trethewey meets Kordian Rak, who discusses the new combo boiler heating both radiant and domestic water. Kays mother and Tom Silva cut tile for the pantry backsplash. Kevin O'Connor meets electrician Matthew Sczensy, who suggests a wireless light switch instead of rewiring.
Problems playing video? | Closed Captioning Feedback
Problems playing video? | Closed Captioning Feedback
Funding for THIS OLD HOUSE is provided by The Home Depot and Renewal By Andersen.
E15 | Ridgewood Colonial Revival | Sugar Maple Revival
Season 46 Episode 15 | 23m 42sVideo has Closed Captions
Jenn Nawada meets tree care expert Matt Chase, who points out issues harming the Sugar Maple. In the basement, Richard Trethewey meets Kordian Rak, who discusses the new combo boiler heating both radiant and domestic water. Kays mother and Tom Silva cut tile for the pantry backsplash. Kevin O'Connor meets electrician Matthew Sczensy, who suggests a wireless light switch instead of rewiring.
Problems playing video? | Closed Captioning Feedback
How to Watch This Old House
This Old House is available to stream on pbs.org and the free PBS App, available on iPhone, Apple TV, Android TV, Android smartphones, Amazon Fire TV, Amazon Fire Tablet, Roku, Samsung Smart TV, and Vizio.
Keep Exploring


This Old House Insider Newsletter
Get This Old House exclusive stories, tips, and behind-the-scenes information delivered right to your inbox every month.Providing Support for PBS.org
Learn Moreabout PBS online sponsorshipKevin: Today on "This Old House," Tom: We're going to do the tile backsplash.
Jenn: Our patio and water feature have been installed, so now it's time to look at the overall health of the existing plantings, especially the sugar maple.
Richard: And when we got here, the heating system was a mess and it didn't work.
Now we've got a work of art.
♪♪ Man: Ahh.
That's it.
♪♪ ♪♪ Kevin: Hey there.
I'm Kevin O'Connor, and welcome back to "This Old House" and to our project here in Ridgewood, New Jersey, where we're in the final few weeks of renovating this 1930s colonial revival.
Hey, Jenn.
Jenn: Hey, Kevin.
Kevin: How you doing?
Jenn: Oh, you know, just cleared out the shrubs.
It was just overwhelmed.
Kevin: Very nice.
And you got a plan for the beds?
Jenn: I do.
Kevin: Of course you do.
Jenn: Of course I do.
Kevin: You can see that the street is lined with trucks because all the trades are here today.
Hey, Matt.
How you doing?
Matt: Hi, Kevin.
I'm well.
How are you?
Kevin: I'm doing okay.
Camille, look at you.
Shipping and receiving for you.
What's going on here?
Camille: Yeah, I'm just going through all of our hardware and finishes to make sure that it's all the right color, and then labeling it so we know where it goes.
Kevin: Are you literally opening every box?
Camille: Yeah, I got to open every box because sometimes it maybe it's not what it says on the outside of the box.
And we want to make sure it's the right item so that it saves some time for our homeowners.
They're not waiting to move in because we're missing doorknobs.
Kevin: Very good.
Camille: Need to get something new, you know?
Kevin: That's good client service.
And you're rocking the parcel look.
Camille: Yeah, company, company uniform.
Right?
Kevin: Speaking of the company, where's the other half?
Camille: Zack's down there in the kitchen, I think.
Kevin: Terrific.
Thank you.
So, center hallway down.
Hup.
Hey, Kordian, how are ya?
We've got staircase there to the upstairs.
Hey, Richard.
Richard: Hey, Kev, how are ya?
Kevin: Alright.
First-floor bath is looking good.
Richard: Beautiful porcelain tiles done, so now it is time for finished fixtures.
Kevin: Very nice.
Alright, next step down is the pantry.
And, Mr. Silva, how are ya?
Tom: Good.
How are you?
Kevin: I'm doing alright.
What are you working on?
Tom: Well, we made a template so we can lay outside all the tile on a table, take this out, cut it and bring it back in.
It should fit perfect.
Kevin: You had me at template.
Tom: [ Laughs ] Kevin: Alright.
A couple steps down here to the addition, which is -- Hey, Mike.
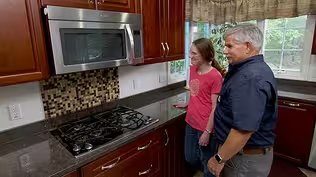
We've got the kitchen down here in the addition on the first floor.
Nice new space, lots of windows.
And, Zack, how are you?
Zack: Very good.
How are you?
Kevin: I'm doing alright.
Boy, this looks -- Well, that looks -- What's the... [ Laughs ] Zack: Just trying a new look out.
Kevin: Are ya?
Zack: Yeah.
Kevin: Cannot imagine where you got your inspiration for that.
Anyway, back to the matter at hand.
Kitchen looks awesome.
Zack: It's cool.
Right?
Kevin: Yeah.
So they got that modern look, right?
Zack: Yeah.
What do you think?
Do you think this looks like a custom kitchen?
Kevin: Is it not a custom kitchen?
I assumed it was coming from you.
Zack: Yeah.
You wouldn't think.
You wouldn't think it is because you see there's no fillers on either side.
But actually these carcasses, these cabinets here, right?
These are just stock cabinets we bought locally and we had the measurement for our cabinets.
So we just framed that wall to be exact size of the cabinets, so we wouldn't have fillers on either side to save some money.
Kevin: Make the room to fit the cabinets instead of the cabinets to fit the room.
Zack: Right.
But when you go stock cabinets, you typically have fewer options with the -- with the skin or the doors, the drawers.
Right?
So we're actually able to work with another company that makes doors and drawers specifically for this cabinet manufacturer.
And that's their -- that's the stock drawer.
Kevin: So this is like the carcass box from one company and this is from another?
Zack: Exactly.
So the homeowners found something they like -- they found the company themselves.
And then so we get sort of a custom look, but it actually saves us like 25% versus going full custom with the whole kitchen.
Kevin: 25% on a on a cabinet package is actually a good chunk of money.
Zack: It's not bad.
You could spend it on the landscaping.
Kevin: Alright.
Well, I would stick around, but that's a little unsettling.
And I've got an appointment with an electrician.
Zack: Aw, come on.
Kevin: I'll see you in a bit.
You're gonna have one soon.
Kevin: No, I won't.
Zack: [ Laughs ] ♪♪ Jenn: The patio and water feature are installed, so now it's time to look at the overall health of the existing plantings, especially this sugar maple.
Our homeowners notice a lot of deadwood up in the canopy, and we decided to call in the experts.
And this is our local expert, Matt.
Matt: Hey, Jenn.
Jenn: So what'd you find?
Matt: I got a beautiful sugar maple here.
Jenn: Yeah.
Matt: Got a call from the client to come out and inspect the tree.
And one of the first things we do is a soil test.
So what we found was there's a couple of deficiencies.
We see this here on the client's report.
Potassium.
Down here we've got manganese and here we've got boron.
Jenn: So this is just like going to your general practitioner doctor.
You do bloodwork to see if everything is functioning properly.
And this is telling us that those are depleted.
So we have to get those nutrients back in.
Matt: Yeah, but what we're going to do today is correct some of these deficiencies, adding some micronutrients to the soil.
Jenn: Okay.
Fantastic.
Matt: So let me show you what else I found.
Over here at the base of the tree, one of the first things that we look at is the root flare.
On my side, you see it's very flat.
Jenn: Yeah.
Matt: Kind of resembles a telephone pole.
Jenn: Right.
Matt: on the other side of this tree, it's got a little bit more of that bell shape.
Having that area exposed is really important because all this soil is really good at holding moisture.
Jenn: Right.
Matt: And holding moisture up against the trunk of the tree isn't good.
Jenn: Right.
Matt: Some of the things that we end up with is decay, which can lead to insects and pathogen attack on the tree.
We don't want this weakened.
This area should be exposed to the elements.
We want it to dry out, unlike the root system.
Jenn: Right.
Matt: So the air and the sunlight do a good job of doing that.
Jenn: Right.
And then you also see sometimes mulch being piled up like a volcano next to the tree.
Everything should be all cleared back so the flare could be exposed.
Matt: Yep.
Jenn: So what's your team?
What's the game plan... Matt: Yeah.
Jenn: ...to remedy this?
Matt: Great.
We're gonna -- We're gonna use some air.
We're gonna blow this away.
Jenn: What I like to hear.
Matt: Here, we're just using a couple hundred pounds PSI Of compressed air.
Jenn: Right.
Matt: Just using that tool to blast away all the soil that's up against the tree.
Jenn: It's so caked on.
Matt: Yeah.
It's exposing all the wood there that's on that trunk of that tree.
Jenn: Right.
Matt: That should be open to all the air.
Jenn: And then this is just such a great, non-invasive tool to just remedy something just through air.
Matt: Yeah.
It's all soil that's moving.
The bark on the tree stays in place.
It's a great thing about this.
It's not a shovel.
It's not a digging tool.
Jenn: And yeah, it's not going to sever any roots.
Matt: Yep.
Yeah.
Here we are.
Classic.
Jenn: Oh, look at that.
Matt: So, much larger than the other roots.
Jenn: So this is the classic example of girdling.
Matt: Yeah.
You can see the pressure.
It's actually deformed the root flare here.
Jenn: Right.
This is exactly what you thought was happening underneath here.
Matt: Yeah.
Had that flat spot kind of gave us a clue what was going on here.
And you can really see the pressure.
Jenn: Yeah.
So by cutting this out, is that going to leave a gaping wound or...?
Matt: There shouldn't be any wound in there.
If anything, maybe a little bit of bark comes off.
Um, I mean, we won't hear it, but this tree is going to have a sigh of relief for sure.
Jenn: Right.
So essentially, that is the correct thing to do.
Matt: Yeah, absolutely.
Jenn: Okay.
♪♪ Matt: It's so close to the tree, it's got to be chiseled out.
I can't fit the hand tools in there with the pruners.
Jenn: Mm.
Matt: See the indentation that's there on the trunk?
Jenn: Yeah.
It's a deep groove.
♪♪ Matt: Jenn, so that soil test that we had in the analysis, what that does is it provides us with all the numbers and what's needed for the soils.
So here we've got the boron, the potassium, the manganese, some nitrogen.
And we're going to tank-mix this in with some water.
You know, it's very important.
It's always a good idea to get a soil test.
We send ours out and do ours.
As a homeowner, you could even use a cooperative extension for your state.
Jenn: Right.
That's what we always recommend.
So this is the prescription for the tree.
Matt: Yeah, this is a prescription.
This is what's necessary to keep that tree happy and healthy.
Jenn: Great.
Matt: Yeah.
So here we -- we tank-mixed everything.
It's coming through the hose now hydraulically, so just water-driven.
Jenn: Okay.
Matt: And he's injecting it into the ground, subsurface feeding.
Jenn: So he mentioned he's putting a grid pattern about three feet apart.
Matt: Yeah.
It keeps track of where he's been and where he's going.
So we get an even application throughout the root system here.
Jenn: Great.
Well, it looks like we've come up with a great solution for this tree, and hopefully it lasts another 80 years.
Matt: Yeah.
Jenn: Thanks, Matt.
Matt: Thank you, Jenn.
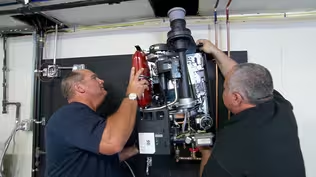
♪♪ Richard: Well, down here, this used to be sort of a spooky basement.
It had a steam boiler right here with all sorts of pipes that went all around the place and radiators upstairs.
Then it had a separate water heater right here.
Now they're all gone.
The chimney has been patched and now it's usable space down here, and the mechanical room is completely relocated to this side of the building where Kordian Rak is going to help us, as always.
Hello, my friend Nice to see you again.
Kordian: Hello.
Nice to see you again.
Richard: Take us through what you're doing here.
Kordian: So, here we've got a combi boiler, and this is going to be doing heating and hot water.
Richard: Right, combination boiler.
Kordian: Combination boiler, compared to our traditional system that we had installed here before.
And we've got basically inside here two heat exchangers.
So this is your main heat exchanger here, which has a gas flame that heats up the water here, sends it down to another heat exchanger, which is going to be doing our domestic hot water for our sinks.
And then this is also doing the heating for our heating system, which goes out to our air handler and for radiant systems.
And you can have instantaneous hot water with this kind of combination boiler.
Richard: And you can have hot water as long as you want it.
Right?
Pretty much all day if you wanted it.
Kordian: And now the difference between this unit, between having a traditional boiler and water heater, is you don't need to use the chimney anymore.
Richard: That's right.
Kordian: Now you can relocate this anywhere and you can use a PVC pipe, which is vented with an intake and exhaust.
It can go out the side of the house and you have to follow a few clearances, one of them being 12 inches away from a window.
You have to be a few feet away from gas meters, electrical services.
Richard: So this was actually a good side, this driveway side right here.
Kordian: Yes, it was a very -- Richard: Okay.
So venting is good.
Alright.
So as the boiler goes, we're going to heat up water, and take us through what's going on here.
Kordian: So our hot water supply for heating is coming up this way, goes up here to this pump.
And it gets sent up to the air handler.
Richard: And this air handler is now on the top floor.
Water goes through that coil that's upstairs like an automobile radiator.
And it comes back a little bit cooler.
Kordian: And it comes back here on this return, and it gets reheated this way, going back up to the heat exchanger.
Richard: Simple.
So there's the heating side.
Kordian: Now, we've also got a radiant system here.
Richard: I love that.
Kordian: So there's a mixing valve here.
So what we're going to be doing is we've got this high-temperature water that's also going to be coming in here, and then we're mixing our return water with that, because we need to send tempered water out into the radiant floor system.
We cannot run high temperatures.
This pump is going to send that into our radiant slab, heat that up and bring it back down this pipe.
Richard: So I even love how you've labeled these with colors too.
So this circulates warm water.
What, 90-degree water probably?
Kordian: Yes.
Richard: Okay.
Through the floor, comes back a little bit cool, just goes round and round and round.
That can just be on all winter long at low temperature heating up that slab.
Kordian: Yep.
Richard: They're going to think of you when it's really cold out.
Kordian: Yes, they will.
Richard: They're gonna be really happy.
Alright.
What do you have left to do?
Kordian: So now I have just an expansion tank left over here.
And what this does is when the water is heated up and it expands, there's a cushion inside here that expands with it as it's heating up and as it's cooling down.
Richard: Like a shock absorber.
Kordian: Yes.
And I went with a compact expansion tank.
Usually when we use these on most traditional installs, it's always hard to find placement for these things, which kind of just stick out like a -- like a apple.
Richard: Well, it doesn't have to, but sometimes it does.
Yeah.
Alright.
Kordian: We've made everything nice and compact for this heating system.
Richard: So when you're done, you can pretty much make this entire mechanical system invisible.
Kordian: Yep.
Richard: Perfect.
Perfectly done.
Kordian: Thank you.
♪♪ Chitlada: Hi, Tommy.
Tom: Hi, Chitlada.
Chitlada: How are you?
Tom: I'm good.
How are you?
Chitlada: Good.
What are you doing?
Tom: Well, I'm measuring for the tile that's going to go on the backsplash.
And you're going to help me install it.
Chitlada: Okay, I will.
Tom: Alright.
So, what we did is we made a template, and this template fits from wall to wall and from under the cabinet to the countertop.
And we also marked for the outlet.
So by making a template that fits the space, we can take this template and use it anywhere like on top of the tile.
Lay it on top of the tile.
I put my level against the bottom of the tile, making it straight, so that represents the countertop.
I take the template and put it against the level and the tile, so everything lines up, and then we trace it.
And that gives us the exact points to where we're going to cut without doing any measuring.
Chitlada: Cool.
Very cool.
Tom: Yeah.
And then over here, the tape is actually going to hold the pieces together.
When we cut it, they don't move.
Let me show you what I mean.
So if we were to take this piece right here that's on a net...
It's on a net.
Holds them all together.
If we were to cut each individual piece, we'd have to hold it carefully.
Be careful that we don't cut our hand.
And when the saw cuts it, it would move like that.
And we don't want them to fly out at us.
We want to keep them together.
Get a nice straight cut.
I'll put that on like that.
So I marked it.
So now what we're going to do is we're going to take the piece and we're going to lay it on.
Let me have that piece of foam right there.
I'll lay this on that piece of foam like that.
That will hold it when we push it through the saw and we'll cut it.
And this is the piece that we want to save.
And then we'll cut this section right out here, and then we'll put it all back together, take it inside, put it on the wall.
Chitlada: Okay.
Tom: You ready?
Chitlada: Yes, sir.
Tom: Okay.
[ Saw buzzing ] [ Saw slows, stops ] Chitlada: Perfect.
Tom: That's what I like to see.
A perfect cut.
[ Saw buzzing ] Now we have to do the outlet.
So what I'm going to do is I'm going to cut beyond it.
Okay, so now we have two cuts, one on each side.
[ Saw buzzing ] So, you can see the benefit of having the tape, how all those individual pieces are held together.
If I didn't have the tape, I'd have to cut one at a time.
So we get one for each side of the outlet.
And that's where the outlet goes, right there.
Chitlada: That looks wonderful.
Tom: Alright.
We're ready to take it in and put it on the wall.
This is an acrylic adhesive.
This tile calls for a 1/8-inch V-notch trowel.
You want to get the wall covered with the flat side first.
Chitlada: Okay.
Tom: See how flat it goes?
Chitlada: Yes.
Tom: Just push hard and drag it right across.
Push it right in there.
Yeah.
Good.
You want to have a pretty good amount because we don't want to see the wall color through the mastic.
So now I'm going to use the notch side.
Put it in the corner and you're going to go 45 degrees and drag it across.
So now you see the color of the wall through the hills and the valleys.
Chitlada: Yes.
Tom: Alright?
Chitlada: Yes, sir.
Tom: So that's how you put adhesive on a wall.
But we got to cover the whole thing.
Chitlada: Okay.
Tom: Alright?
♪♪ I'm just gonna put this in, line up all the pieces.
♪♪ ♪♪ Alright.
What do you think?
Chitlada: Well, it look great.
Tom: Yeah, I got a little more touch-up to do, and it'll clean up, and then we wait 24 hours before we can grout it.
Chitlada: Wonderful.
Tom: Okay.
Thanks for your help.
♪♪ Kevin: They are putting the finishing touches on the electric inside, but there's still a little bit of work to be done outside.
You recall last week the water feature went in, so beneath the big stone and the pebbles is a basin of water with a pump, and that needed power.
And so, Matt, this was sort of an afterthought.
Not in the original plan.
Right?
Matt: Yes, it was.
So we had to make a return trip to run a conduit from the house all the way out here to the side of the water feature.
We got our rocket post in, which has an in-use cover to expand out to accommodate the plug.
Kevin: Yep.
So it doesn't have to kink over and bend that plug.
That's nice.
Matt: Right.
And you'll see that this is just a normal, tamper-resistant, weather-resistant receptacle.
Kevin: Versus a GFCI?
Matt: Correct.
We have the GFCI inside the basement for convenience purposes.
If it does ever trip, you can just go downstairs in the basement and reset it.
Kevin: Oh, that's pretty clever.
So this will sense any problem.
But if for any reason it trips, resets in there.
That's convenient, so you can go there, not out here.
Matt: Correct.
Kevin: Very nice.
Alright.
And we've got working power?
Matt: Sure do.
Kevin: Oh, we got it.
So is that what the homeowners are going to have to do is sort of plug it in when they want it on, unplug it when they want it off or do we get a switch?
Matt: We're going to have a switch.
Kevin: Here?
Matt: Inside.
Right by the side door, kitchen.
Kevin: Show me.
Matt: Sure.
Kevin: Let's look at that.
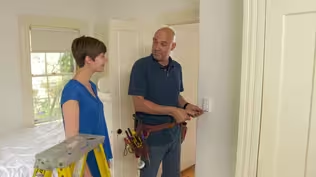
Matt: We were able to get the conduit in before the pavers, but we were not able to get the wiring in before the Sheetrock because the water feature was an afterthought.
Kevin: So this switch was already here, and that's not the one to the water feature?
You need a new one?
Matt: Right.
This switch here is going to serve the coach light right outside the door.
Kevin: Right.
Matt: And the only way we would be able to get wiring to this switch location for the water feature would be open up Sheetrock up to the ceiling across the doorway above the basement door, down the stairwell in the basement, and that requires a lot of Sheetrock repair, extra cost to the customers.
And we can't come from beneath because this is on a slab.
Kevin: Correct.
So that's a ton of work.
Your solution?
Matt: Well, our solution is to add a wireless smart switch here.
Kevin: Mm!
I've seen it before actually.
So you got an on and off toggle, basically.
Matt: Yes.
Kevin: Nothing wired.
What is this talking to?
Matt: This is talking to the master switch down inside the basement, and it operates over radio frequencies.
Kevin: So that's a hardwired switch into a circuit?
Matt: Correct.
Kevin: And then this is just wireless.
Matt: Communicating back and forth.
And it's got a 10-year battery.
You can have it mounted on the wall, on your countertop.
Put it on a pedestal so it'll sit on top of a tabletop.
Kevin: Yeah, yeah, yeah.
Matt: It's got many functions.
Kevin: Can you -- Are you ready to install?
Matt: Yeah.
Let's do it.
Kevin: Let's see how -- I don't know what I can do to help, which is usually me just staying out of your way, but -- Matt: The best way to do this here is just take your cover plate, get a level on it.
Watch your fingers there.
We'll mark the holes where the cover plate actually attaches to a device.
Take that.
Kevin: So, typical cover plate for two paddle switches.
Matt: Correct.
Kevin: Nice.
Matt: Mm-hmm.
So now we'll take this wall bracket.
We'll line up our two marks with the topmost center and bottom holes.
And we'll mark our oval-like hole.
Kevin: And the oval is because you're going to screw this into the Sheetrock?
Matt: Sheetrock.
Kevin: You got that.
[ Drill whirring ] I'll take that from you.
Matt: Sure.
We'll get our anchors in here.
Okay.
Get our cover plate on, see how that lines up.
Kevin: And I mean, realistically, this could have been two wireless switches right here.
I mean, if you had two different circuits you wanted to control, right?
Matt: Correct.
Yeah.
We could add as many wireless devices as we'd like.
Kevin: How do we fire it up?
Matt: Just press this on button right here.
And the water feature should fire right up.
Kevin: The water feature fired right up.
Matt: Beautiful.
Kevin: That's awesome.
That's a nice little fix there.
Thank you, Matt.
Matt: Yes, it is.
Sure.
No problem.
Kevin: That's great.
♪♪ So, Tommy, pretty exciting, huh?
Next time we're down here, this project is going to be done.
Tom: Yeah.
I can't wait to see it complete because it's looking great right now.
Kevin: It really is.
Crew's done a good job.
So what do you guys think, Zack?
We got, uh, next ti-- We g-- What did the... That was disturbing this morning.
Charlie, Justin, that's triply -- What is going on with the mustaches?
Zack: Ah, who doesn't want to be a little bit more like Tom Silva?
Tom: [ Laughing ] Oh, geez.
Kevin: That's actually a good point.
Alright, well, are you excited for, uh -- We're going to wrap this whole thing up next week, right?
Zack: Yeah, we'll be good to go.
Kevin: Alright.
I like to hear it.
So until then, I'm Kevin O'Connor.
Tom: I'm Tom Silva.
Zack: I'm Tom Silva.
Charlie: I'm Tom Silva.
Justin: I'm Tom Silva.
Kevin: For "This Old House."
God help us.
Four Tom Silvas.
Tom: What a crew.
Zack: How we doing?
[ Laughter ] Tom: Oh, you're doing great.
Kevin: I'm channeling you guys.
[ Laughter ] It's more like [nasally voice] and I'm Tom Silva.
[ Laughter ] ♪♪ Kevin: Next time on "This Old House"...
So, Peter, Kay, we kicked you out nine months ago.
I've heard someone refer to it as your house baby.
Peter: That we do.
Kay: Here we are, nine months later.
Kevin: How does it feel to be home again?
Kay: It's amazing.
Peter: Yeah.
We're so grateful.
Kevin: We are wrapping up work here in Ridgewood, New Jersey, on our 1920s colonial.
Tom: It really came out great.
Kevin: Front of the house looks good.
I'd love to see the inside.
Anyone want to give me a tour?
Richard: You want to see the attic or the basement?
That's my world.
Kevin: That's next time.


- Home and How To

Hit the road in a classic car for a tour through Great Britain with two antiques experts.


Support for PBS provided by:
Funding for THIS OLD HOUSE is provided by The Home Depot and Renewal By Andersen.