E19 | Retaining Wall, Mini Split Upkeep | Ask This Old House
Season 23 Episode 19 | 23m 42sVideo has Closed Captions
Richard shows how to maintain a mini split; Mark and Jenn build a garden retaining wall.
Richard Trethewey demonstrates how to maintain a mini split, showing how to properly clean the indoor and outdoor components to keep the unit running optimally; then, it's rubber, round, and has a waffle shaped top. The guys play What Is It; Mark McCullough and Jenn Nawada team up to help a homeowner upgrade her house's curb appeal by building a garden retaining wall.
Problems playing video? | Closed Captioning Feedback
Problems playing video? | Closed Captioning Feedback
Funding for Ask This Old House is provided by The Home Depot, Renewal By Andersen, and ChipDrop.
E19 | Retaining Wall, Mini Split Upkeep | Ask This Old House
Season 23 Episode 19 | 23m 42sVideo has Closed Captions
Richard Trethewey demonstrates how to maintain a mini split, showing how to properly clean the indoor and outdoor components to keep the unit running optimally; then, it's rubber, round, and has a waffle shaped top. The guys play What Is It; Mark McCullough and Jenn Nawada team up to help a homeowner upgrade her house's curb appeal by building a garden retaining wall.
Problems playing video? | Closed Captioning Feedback
How to Watch Ask This Old House
Ask This Old House is available to stream on pbs.org and the free PBS App, available on iPhone, Apple TV, Android TV, Android smartphones, Amazon Fire TV, Amazon Fire Tablet, Roku, Samsung Smart TV, and Vizio.
Keep Exploring


This Old House Insider Newsletter
Get This Old House exclusive stories, tips, and behind-the-scenes information delivered right to your inbox every month.Providing Support for PBS.org
Learn Moreabout PBS online sponsorship♪♪ Kevin: On "Ask This Old House," our experts travel across the country to answer questions about your house.
♪♪ Today, did you know that mini splits require maintenance?
Richard shows us how to keep them up and running.
Then Mark and Jenn answer the call to help a homeowner who wants to add curb appeal to their corner lot.
Olivia: We're either looking to kind of level this off or build a retaining wall around it, just to kind of keep everything contained in here and make it look a little bit nicer and function better, as well.
Kevin: All that on "Ask This Old House."
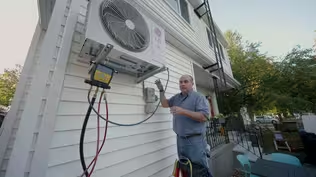
♪♪ Richard: Mini split air conditioners are the rage.
They're going in everywhere.
77% of the world's air conditioning market is done by mini splits.
Now, the term "mini split" means the two important components are split apart.
Unlike a window air conditioner where everything is in one box, these units will have an indoor unit and an outdoor unit connected by refrigerant piping in between.
There's no ductwork at all.
These are ductless units.
Now, they go in.
They're quiet.
They're efficient.
They can heat even on the coldest day.
They can cool perfectly.
But sooner or later, these units need to be maintained.
So I thought it would take a minute to talk about what you or a professional would do to keep these units running optimally.
Alright, so, our first line of defense is to protect the airflow that's gonna go through the unit.
Now, this is something that any homeowner can do and should be done regularly.
So, most of them will open like this, and that exposes the basic filter right here.
Every bit of the air that's in the room has to come in across that filter, be heated or cooled, and then come out through the bottom down here.
That means that anything that's in the air can be trapped on these filters.
But if you look right here, that's how it looks when it's clean, and that's -- you can see it's starting to cake up a little bit.
You know, you can't make these clean enough.
So, you vacuum this gently with a brush, and that gets some of the airborne stuff out of it, but the simplest way is to take them into the kitchen sink or outside and give them a spray with a hose.
♪♪ Now, changing the air filters may be all that you really want to get involved with, but there are times that this unit needs a deeper cleaning on these components inside.
And it starts with getting this cowl off.
And that's often the hardest part of the job because you got to figure out how it was put together.
Couple of tips.
One is a magnetic screwdriver and a collector point for those screws because if you drop a screw somewhere, you're screwed.
♪♪ There we go.
Alright, a little bit of dirt and staining there that we'll clean up.
So, it's important before I go any farther we've turned the power off to this unit so there's no chance of any electrocution.
There's a digital readout right here, so it has a couple of electrical connections that need to be broken.
There we go.
Be careful not to damage those fins.
Now, there's also a turning vane and that's the device that controls where the air goes in the room and that's got little spring clips underneath.
♪♪ And then there's this little motor that drives the vane.
Okay.
Okay, there's one more layer I need to get down to to expose everything, and that's these diffusion vanes right here.
There's two screws.
I've removed them right here.
And then I want to peel this back.
Now, the first time you remove it, it feels like you're breaking it.
♪♪ Okay.
So now I'm gonna let this hang right here.
Now I can carefully vacuum the coils with a bristle brush.
♪♪ So, now we're gonna introduce water.
And water and electricity don't mix.
So, we've got the unit powered off at the breaker.
We've also covered up the electrical components right here.
And water and wallpaper don't mix, either.
So, what they've got is a kit that will be able to protect the walls.
And I'll be able to collect all the water down into a bucket.
Alright, we're set to clean the coils.
Now, this is a coil cleaner.
Using it straight, and so it's a little bit caustic, so we're gonna protect eyes and lungs.
♪♪ Alright, now, the blower wheel is up inside here.
♪♪ ♪♪ Alright.
So, now we're gonna let that sit and dry out.
But there's one more important coil we have to think about cleaning, and that's outside.
♪♪ Now, this has a big fan, and this is pushing air across a coil.
So we're gonna have to vacuum carefully and then use a coil cleaner.
♪♪ ♪♪ So, we gave it about an hour to dry out these component parts, and we cleaned up the cowl and the lube and everything else.
And now the last thing to do is to actually put the filter back in.
You know those filters you promise you're gonna clean every week, right?
You promise.
Close it up.
Power's back on.
Turn it on.
Hey.
It works.
That's good.
Now, this is a project you may not have to do tomorrow, but if you've got mini splits, someday in the future, you or some professional is gonna need to do this.
I hope you learned a little bit.
[ Tools whirring, saw scraping ] ♪♪ Alright, gang, they are gray, black base, a little grille right here.
What is it?
You each get one of them.
Tom: Oh, yeah, I know what these are.
Kevin: Been waiting for these.
This is gonna round out -- No, no, I got it.
I got it right here.
Fine culinary tradition here.
Richard: Yeah.
Kevin: The Irish.
[ Laughter ] Everybody knows that some of the finest food is small.
Richard: Yes.
Kevin: Amuse bouche.
Richard: Amuse bouche.
One bite.
Kevin: I mean, you know, a doughnut's fine, but a munchkin?
Richard: Yeah.
Kevin: Better.
Tom: Much better.
Richard: Better for you.
Tom: I'll go along with that one.
Kevin: Chicken nugget.
Who needs the whole chicken?
Richard: Pig in a blanket.
Kevin: You've been.
Richard: Little.
Kevin: That's great, except that when it comes to Sunday brunch, everything's big.
Pancakes are stacked up.
The bacon is piled up.
It's huge.
And the waffles -- you could get lost in one of those things.
Tom: Oh, yeah.
Kevin: That's where this comes in.
Richard: What is that?
Kevin: It's a little waffle maker.
So, you pour the batter in there.
You put the top on right there.
You give it a good hard squeeze, and out comes "ze wafflette."
Richard: The wafflette.
Kevin: The wafflette.
Richard: Available in your stores soon.
Tom: Bite-sized waffle.
You're so far off, it's scary.
I've seen these things, and these are amazing.
So, if you ever had a wet basement or a water heater breaks... Richard: Yeah.
Tom: ...basement floor floods, you take these out of the drawer and you throw them all over the floor and they suck up all the water.
Richard: What do you do with the water?
Tom: Take them outside and you dump them out and bring them back and do it again.
Might take a couple days.
Richard: Crazy me.
I've been putting pumps in.
Crazy.
Tom: That's stupid.
Look at the money and the time you would have saved.
Richard: We saved a lot with these.
Kevin: Help them out, Mauro.
Mauro: No problem.
This is nothing but a street game, right?
It calls the shell.
You're gonna say you put a coin underneath one of them.
Tom: Yeah.
Mauro: Alright, just like that.
Scramble them around, right?
You got 100 bucks on you?
Kevin: Oh, we're betting here?
Mauro: Yeah.
Kevin: How about a five-ski?
Mauro: Five is good, yeah.
Alright, we'll take that.
Scramble them around, alright?
And then you find the coin.
Kevin: Find the coin.
Obviously it's right -- Oh.
Tom: Find the coin.
Kevin: What?
Tom: I see it.
Mauro: It's right there.
Tom: I'll take the fiver.
Kevin: Hey, hey hey, ho!
Richard: You don't get the money.
Mauro: That, by rights, is mine.
Tom: I found it.
I found it.
Richard: Alright, it actually has a very functional use.
Except you need a fourth one.
Tom: Oh, see, you left out... Richard: Well, there's only three of you.
There's only three of you.
[ Laughter ] Alright, your dryer's in the house, you turn it on, and it can do the two-step when it's on its spin cycle and just dance right into the hallway.
Tom: Yeah.
Kevin: What kind of dryer?
Richard: Well, it's a dancing dryer.
And you put the dryer up on these, the legs, and it acts as a shock absorber and makes it quiet so you don't hear it.
And it actually works.
Tom: Actually sounds pretty good.
Richard: It actually does.
Or you can do a shim with a shingle.
Tom: Yeah.
Mark: So, Jenn, today we have a homeowner that needs our help revamping her garden bed.
It's really uneven.
It slopes down.
And she doesn't know if she should just flatten it or add a retaining wall.
What do you think?
Jenn: Well, from the pictures that I saw, it's screaming for a retaining wall for sure.
Mark: Right, exactly what I was thinking.
And the good thing about installing this retaining wall is we can add drainage, which means the wall is gonna be there forever.
Jenn: Sounds like a perfect plan and a perfect job for the two of us.
Mark: Yeah, Jenny.
♪♪ Jenn: Hi, Olivia.
Olivia: Hi, Jenn.
Nice to meet you.
Jenn: Nice to meet you.
Olivia: Mark, nice to meet you as well.
Mark: Olivia.
My pleasure.
Olivia: Absolutely.
Thanks for coming.
Mark: Alright.
Jenn: So, show us this garden project you're talking about.
Olivia: Right around the corner.
Jenn: Alright.
Olivia: Alright, so, here's the garden.
Jenn: Okay.
Olivia: And we do love having it here, but there's kind of two issues that we have right now.
The first is that we do live on a main road, so we are looking to kind of have some more curb appeal than we currently have, just give it a face-lift.
The second thing is the drainage issue.
So, with all the rain that we get and the gutters running off right here, it does cause a lot of the mulch to end up into the grass.
And it's kind of covered these stones that we have in the front here.
And we're either looking to kind of level this off or build a retaining wall around it, just to kind of keep everything contained in here and make it look a little bit nicer and function better as well.
Jenn: I like that.
Let's look at all of this from a different angle down here.
Olivia: Okay.
Jenn: I mean, what I see here -- retaining wall all day long, right?
Mark: Yeah.
Jenn: I mean, this whole space could be leveled.
It doesn't have to be perfectly level, but if we run a wall from there over to here and just return it into grade.
What do you think, Mark?
Mark: I love the idea of a retaining wall.
It's gonna give you everything in curb appeal that you're looking for.
Olivia: Right.
Mark: We do have some drainage, Jenn.
Jenn: Yep.
Mark: We'll bury those.
You can see the line on the granite isn't very even.
It pops up and down.
So we'll clean that up, make a straight line.
I do not like that window well.
Snow builds up and then melts into that window well.
That's not good.
So, I think if we drop the grade up here three or four inches, that's gonna expose that window well, and it's gonna let us bring the grade into the back of the wall.
Olivia: Okay.
Mark: If I'm looking at a two-foot wall... Olivia: Okay.
Mark: ...that's gonna accommodate that three- or four-inch drop and also give us a slope into our drainage.
So, why don't we... Jenn: Alright.
So, I'm putting this tape out here so you could just see.
Mark: Yep.
Jenn: It doesn't have to be perfectly level, but... Mark: Just a guesstimate.
Olivia: Yeah.
Jenn: So, about a two-foot wall.
We could roll the grade into the back of the wall.
Olivia: Okay.
Jenn: And then -- And then address everything else, like keeping the water -- water management, keeping it away from your house.
Olivia: Yeah.
I like it.
Mark: Alright, let's go.
Jenn: Let's get to work.
♪♪ Mark: First, we need to remove the old edging and downspout extensions.
Jenn: See you later.
Alright, so, here's what we're thinking for the layout.
What I want to do is run a straight line from the corner of this deck all the way down towards here.
And by the way, we've called 811, which is the utility service, just to know that this area is clear.
Olivia: Awesome.
Jenn: Alright, so, what I'm thinking is about to this, like, the 28-foot mark.
Mark: Yeah.
Jenn: Right?
And then we're gonna run it all the way down and then return it into here.
What do you think of that?
Mark: So, I think that's great.
And what I've actually done, Jenn, is I've pulled the tape from that corner of the foundation to this corner of the foundation.
Olivia: Yep.
Mark: 174 inches.
So, I want to take this paint.
Jenn: Okay.
Mark: And this'll just give us a rough idea on where we're gonna dig.
Olivia: Okay.
Awesome.
Mark: Alright?
Jenn: And we're digging to put the footing for the wall in.
Olivia: Right.
Okay.
♪♪ Mark: While we could have used shovels, I brought a mini excavator to dig the trench for the wall base and to help us regrade the soil.
♪♪ The trench will need to be wide enough to fit wall blocks and a four-inch drainage pipe.
I'm digging eight inches deep, but the depth will vary based on the block manufacturer's instruction.
♪♪ After we compact the dirt, we'll add about six inches of gravel.
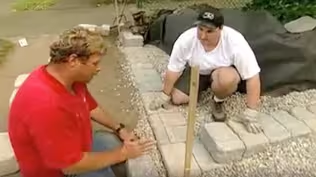
♪♪ ♪♪ Jenn: Okay, so, we picked this wall because they are interlocking concrete blocks, and that's gonna create the retaining wall.
Love the nice smooth appearance.
Olivia: Yeah.
Jenn: And Mark's gonna tell us how we put it together.
Olivia: Alright.
Mark: Okay.
This system has three different kinds of block -- corner block... Olivia: Got it.
Mark: ...finished edge, finished edge, stretcher block, finished edge in front, and a cap block.
Olivia: Okay.
Mark: If I pick this cap block up, you see that?
That's the interlocking system.
So, it's a tongue-and-groove.
And it really locks down the cap.
Olivia: Right.
Mark: We are gonna use some construction adhesive on the cap and on the corner.
Olivia: Okay.
Mark: Stretcher, don't need it.
Olivia: Got it.
Mark: We're gonna take the entire system and we're gonna put it on a gravel bed that we just prepped.
And that's for drainage.
Olivia: Great.
Mark: Alright, let's go.
Now, the first couple things that I did was I made sure the foundation was square.
That's important because I'm gonna be pulling my tape off of that foundation and we need this wall to be in the right place.
Olivia: Right.
Mark: So, I know you wanted to bring it out close to the end of the deck... Olivia: Right.
Mark: ...which is what I've done.
Olivia: Awesome.
Mark: So, the first thing I did was I pulled my tape from the foundation all the way to this area in here, which is 173 inches.
And I also did the same down that end.
Olivia: Okay.
Mark: That allowed me to set a stake there and here and run a string.
This string here represents the face of our wall.
Olivia: Okay.
Mark: The lower string represents the first course, if you will.
The most critical point right here is to make sure that this wall is flat and level.
Olivia: Okay.
Jenn: Yeah, and that's the most important to have this level because the block that we picked is very linear.
Olivia: Right.
Jenn: And so if it's off just a little bit, you're gonna see a wonky wall.
Olivia: Okay.
Mark: Right.
And if we get this first course down perfectly, the rest of the wall is gonna be really easy to build.
Jenn: Absolutely.
Mark: So, what I have right here is what I call a benchmark.
It's just a block.
I've leveled it this way, and I've leveled it that way.
So I know this block and this benchmark is completely level.
Olivia: Okay.
Mark: And the next thing I'm gonna do is I'm going to take a block and I'm gonna spot it six feet away.
I'm gonna make sure that is very, very level.
I'm gonna do that again every six feet until I get down to the end of the wall.
And then we're gonna know that that first course is perfect.
Olivia: Okay.
Mark: Alright, so, Olivia, we've been setting this thing up.
Maybe we've knocked a couple things around, so I always want to double-check before we really get going.
Olivia: Awesome.
Mark: So I have a little square, and I just want to run off the side of my block over to my string.
Olivia: Yeah.
Mark: You can see we're square.
Olivia: Absolutely.
Mark: I also throw a line level up.
Olivia: Right.
Mark: And I'll run it across this line as we work backwards, just to make sure that we're all set.
Olivia: Okay.
Mark: Alright?
So, why don't you give me that block right there?
Thank you.
Olivia: Mm-hmm.
♪♪ Mark: These cavities are throughout the first course.
You can see them, right?
Olivia: Yeah.
Mark: So, before we put the second course down, we're just gonna fill those cores with gravel.
That's gonna give us the continuation on the drainage, but it's also gonna give us a little stability.
Olivia: Makes sense.
♪♪ Mark: So, this is where it gets easy.
We're just now putting it into place.
And we're going to move down just like that.
Olivia: So it looks great.
But just one question.
Mark: Okay.
Olivia: Right here, it's looking like it's moving in a little bit.
Mark: Right.
So what we're going to do is what we call rack back the wall.
Olivia: Okay.
Mark: So we're going to go back a quarter inch every single course.
Now, what that does is any pressure that gets applied from behind the wall, it's going to push the block a little bit.
And you see our tongue-and-groove... Olivia: I do, yes.
Mark: ...that we talked about before?
That's going to lock this wall into place and be able to resist the pressure that may or may not come from behind the wall.
Olivia: Got it.
Mark: Alright.
So let's keep going.
♪♪ Jenn: You guys finish on the wall, I'm going to take care of the grade in the front.
♪♪ ♪♪ Mark: Perfect.
Jenn: We just want to put the soil halfway up the first course.
And that's going to help us with drainage.
Okay, now we have connected both of these downspouts to these downspout connectors.
And they're connected to this perforated pipe... Olivia: Okay.
Jenn: ...which we wrapped in fabric so we keep sediment out.
And all this water is going to go away from the house to the drainage system we have behind the wall.
Mark: So, behind these retaining walls, all retaining walls, we have multiple components that have to work together to drain the water.
Olivia: Right.
Mark: So, as Jen just told us, this pipe is perforated.
And I just wanted to show you the perforations.
Olivia: Right.
I see.
Mark: Okay?
So that's going to let the water in and travel down the length of the pipe.
An outlet on the end.
Olivia: Yep.
Mark: And we have the same situation going on this end.
Olivia: Got it.
Mark: The other component that I wanted to let you know about is the gravel.
The gravel is twofold.
It's actually going to get the water to dribble all the way into this pipe.
Olivia: Okay.
Mark: But it's also going to alleviate pressure that may or may not build up behind these walls.
Fabric paper, Jenn.
Jenn: Now let's just backfill.
Mark: Alright, Olivia.
So you'll be the glue person.
Olivia: Okay.
Mark: Give me some adhesive there.
There you go.
Great.
Olivia: About there?
Mark: Other side of the tongue.
And then square me up.
That's great.
And give me a little dab right in the middle.
I like that.
Sometimes it helps me balance.
Olivia: Perfect.
Mark: But you notice that this is, again, tongue-and-groove system.
Olivia: Right.
Mark: So this is going to fit nicely.
And there I am, lined up with the groove.
I'm going to get my level.
Olivia: So, it does look like this is sticking over a little bit.
Is there a reason for that?
Mark: Sure, and I'm glad you noticed that, because this is the capstone, so it's going to get the most water.
Olivia: Got it.
Mark: Water's going to want to run off.
It's going to run over this, then down the edge.
And this is going to act as a drip edge.
So that's why we're going to hang it out a little more.
Yeah.
We're going to do that on all sides.
Olivia: Okay.
Mark: And the groove helps us do that, so...
Okay, that was actually a good bit of glue, because I'm perfect every which way.
Olivia: Perfectly level.
Mark: Alright.
So, let's go for number two.
Olivia: Okay.
Mark: Other side of the tongue.
Exactly.
Okay.
Nicely done.
And, again, we're gonna make everything tight.
Great.
Olivia: Perfect.
Jenn: Alright, so I've laid out all the plants, you know, to fill this whole area.
I didn't want to have anything up against the foundation of the house.
So, in this area, I have a boxwood, a green mountain boxwood here and at the other end.
Olivia: Okay.
Jenn: Those will anchor the corners.
Olivia: I love it.
Jenn: These are all little Quick Fire hydrangeas.
Olivia: Okay.
Jenn: And I picked everything to be kind of low, because I just didn't want it to go over your window.
Olivia: Yeah.
Jenn: It's far enough away from the house that you have a little access passageway.
Olivia: Right.
Jenn: Over here, this is a Delaware Valley White azalea.
This is a Cunningham White rhododendron.
They both are white-blooming, spring-blooming plants.
Olivia: Awesome.
Jenn: Over here, this one is an oakleaf hydrangea.
Olivia: Okay.
Jenn: Beautiful, beautiful color.
Olivia: Yeah, I love that.
Jenn: And that's going to fill out this area beautifully.
Repeated another Delaware Valley White.
Olivia: Perfect.
Jenn: And the bonus here -- I left this whole area right behind the wall so you could do bulbs, perennials, annuals, seasonal stuff.
Olivia: Okay.
Jenn: But that's the area you could play in.
Olivia: Yeah, I love that.
♪♪ Jenn: You don't want to plant it too low.
Olivia: Right.
Jenn: If you plant it higher, it's better.
That's good.
Olivia: Okay.
Jenn: If you plant it too low, the base is going to get rotten.
Olivia: Okay.
♪♪ Jenn: I think that looks good.
Olivia: Yeah.
♪♪ Jenn: Alright, you guys, look at this.
It really opens up the space.
Mark: It does.
Jenn: You have a wall to sit on.
You addressed your drainage problem.
Olivia: Yeah.
Jenn: I think it's beautiful.
Mark: Yeah, it looks great.
Olivia: It looks amazing.
I think it really gives us the curb appeal that we're looking for, and I know the drainage issues are fixed because of all the prep work we did.
Mark: Right.
Olivia: So thank you guys so much.
Jenn: Yeah.
No problem.
Mark: You're welcome.
Jenn: So if you've got questions, keep them coming.
We'd love to hear from you.
Until next time, I'm Jenn Nawada.
Mark: And I'm Mark McCullough for "Ask This Old House."
♪♪ ♪♪ Kevin: Next time on "Ask This Old House," Heath helps a homeowner troubleshoot his rising electric bill.
Heath: This one's moving pretty quickly.
I'm gonna guess this one's for you.
Kevin: Then Tommy gives us a primer on routers.
Tom: You put a bit in, and that bit gives you the profile or detail that you're looking for.
Kevin: And Lee shows a few good tools to get our lawn ready for spring.
All that on "Ask This Old House."


- Home and How To

Hit the road in a classic car for a tour through Great Britain with two antiques experts.


Support for PBS provided by:
Funding for Ask This Old House is provided by The Home Depot, Renewal By Andersen, and ChipDrop.